
Scanning barcodes
Scan a barcode once and InvenDo remembers the product. From then on, a scan is the fastest way to add a pack to your Inventory, take one out when it’s used up, find an item, or move a purchase off the Shopping List.

Where you can scan
Section titled “Where you can scan”- Scan ” + ” in the bottom bar — add to the Inventory or the Shopping List, depending on the tab you’re on.
- Scan ” - ” in the bottom bar (Inventory tab) — take one out.
- Scan to Inventory in the bottom bar (Shopping List tab) — move something you’ve just bought into the Inventory.
- The barcode icon in the search field — find an item by scanning it. Works in both tabs and in Manage → Catalog.
- The Barcodes section of an item — attach one or more barcodes to a product.
The first time you scan, allow InvenDo to use the camera. If you declined, you’ll be asked to allow it in your phone’s settings.
Adding with Scan ” + ”
Section titled “Adding with Scan ” + ””-
On the Inventory tab, tap Scan ” + ” and point the camera at the barcode.
-
Known product? The form opens with everything filled in from the catalog — name, category, unit, price, store, photo. Set the quantity (it starts at 1), the expiry date and the storage place. See Adding and editing items.
-
New product? The form opens empty with the barcode already attached. InvenDo looks the barcode up online and, if it finds a match, offers the product name — tap it to use it, or type your own. Fill in what you like.
-
Tap ✓ to save.
Next time you scan that barcode, InvenDo knows it. If you add the same product with the same expiry date to the same storage place, the quantities are simply added together.
On the Shopping List tab, Scan ” + ” works the same way, adding the item to the Shopping List instead.
Taking items out with Scan ” - ”
Section titled “Taking items out with Scan ” - ””-
On the Inventory tab, tap Scan ” - ” and scan the pack.
-
The Remove Item dialog shows the product and what you have. Enter how many you’re taking out — 1 is suggested — and confirm.
-
If the same product is in several places or has several dates, InvenDo first asks you to Select an item to remove.
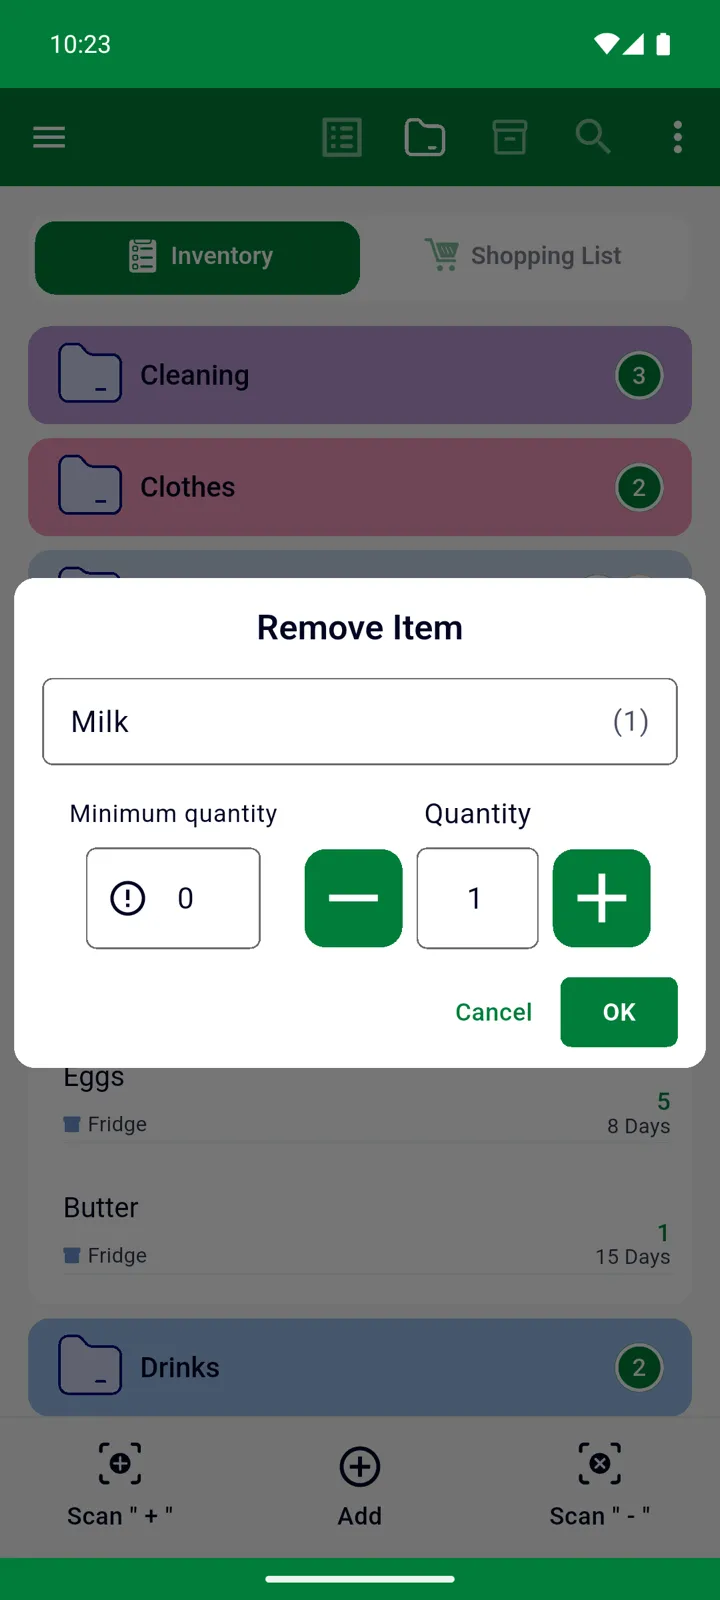
When the quantity reaches zero, the entry disappears from your Inventory. If the barcode isn’t in your Inventory, you’ll see Item with this barcode not found!
Moving purchases in with Scan to Inventory
Section titled “Moving purchases in with Scan to Inventory”Back from the shop? On the Shopping List tab, tap Scan to Inventory and scan each pack. The Add to Inventory dialog lets you set the expiry date, the storage place and the quantity; confirm, and the item is taken off the Shopping List and put into your Inventory. See Using the Shopping List.
Several barcodes for one product
Section titled “Several barcodes for one product”You buy pasta from different brands but only want to see “Pasta” in your list? Give the product every barcode you come across.
-
Open the item (tap it, then Edit) or the product in Manage → Catalog.
-
Under Barcodes, tap the scan button and scan the new pack — or tap the keyboard button and type the number.
-
Tap ✓ to save.
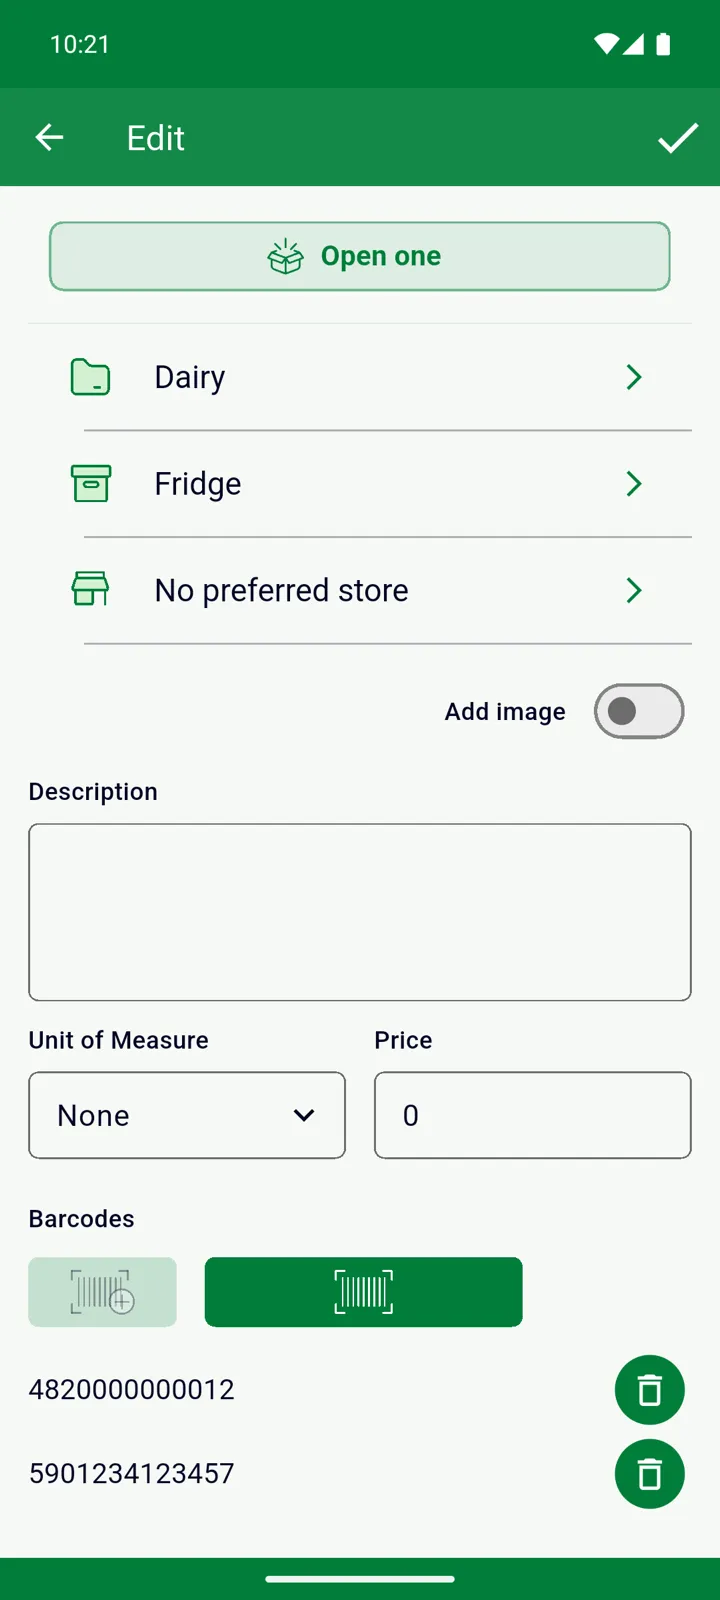
Each barcode is listed with a bin icon to remove it. Barcodes belong to the product in the catalog, so they apply to every entry of it — see Catalog.
Good to know
Section titled “Good to know”- Online lookup. When a barcode is new, InvenDo checks two public product databases — Open Food Facts and Edamam — for the product’s name and photo. Coverage depends on the country and language. Turn this off under Settings → Barcode Lookup if you’d rather it didn’t. See Product lookup.
- Android scanner options. Under Settings → Scanner you can pick a different scanner engine if the default struggles with your phone, or set up an external hardware scanner. If InvenDo says The selected scanner is not available on your device, choose another one there. See Scanner settings.
- Web version. There is no camera scanning at web.invendo.app. Barcodes can be typed in, and everything scanned on your phone is available there. See InvenDo on the web.
Still need help? Contact us